
Maximise your travel data with Nomad eSIM for seamless internet connection in 200+ destinations worldwide, from US$4.50 (~S$5.80)!

Zurich is known for its stunning alpine views, pristine streets, and… steep prices. From dining out to transportation, travelling here can get expensive — and mobile data is no exception. But after navigating the city for a week, we figured out how to stay online without overspending.
Whether you’re searching for directions on Google Maps, booking last-minute activities, or just trying to share that perfect Lake Zurich sunset on Instagram, this eSIM guide will walk you through seven practical tips to stretch every megabyte while travelling.
Read on to learn of a nifty discount for your next Nomad eSIM plan!
1) Skip Roaming and Get an eSIM Instead (We used Nomad eSIM)

As someone who’s been caught off-guard by roaming charges — once forgetting to switch off roaming and racking up S$50 in just a few seconds — I’ve learned the hard way just how important it is to stay connected reliably, and without unexpected costs.
That’s why an eSIM is such a game-changer! It’s a digital SIM that lets you connect to mobile networks without needing a physical card. And compared to traditional data roaming, which can cost up to S$50 or more per day (depending on your provider), the plans are typically far more affordable and with no surprise fees.
For example, Nomad eSIM offers a cost-effective eSIM solution for travellers, with plans starting at US$4.50 (~S$5.80) for 1GB.
Unlike other providers, Nomad also allows data transfer and sharing, so one person can purchase a plan and share it with others if your family is splitting itinerary or hotspotting if staying closely together — perfect for families or groups.
As part of this eSIM guide, here’s what you need to know about Nomad’s data plans, and how to install one quickly.
Type of Nomad eSIM Plans
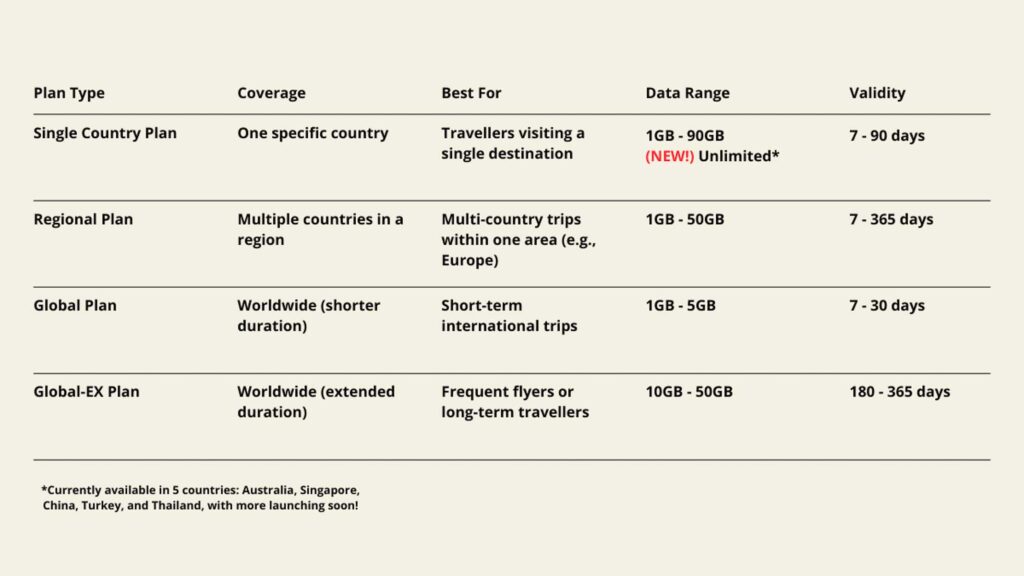
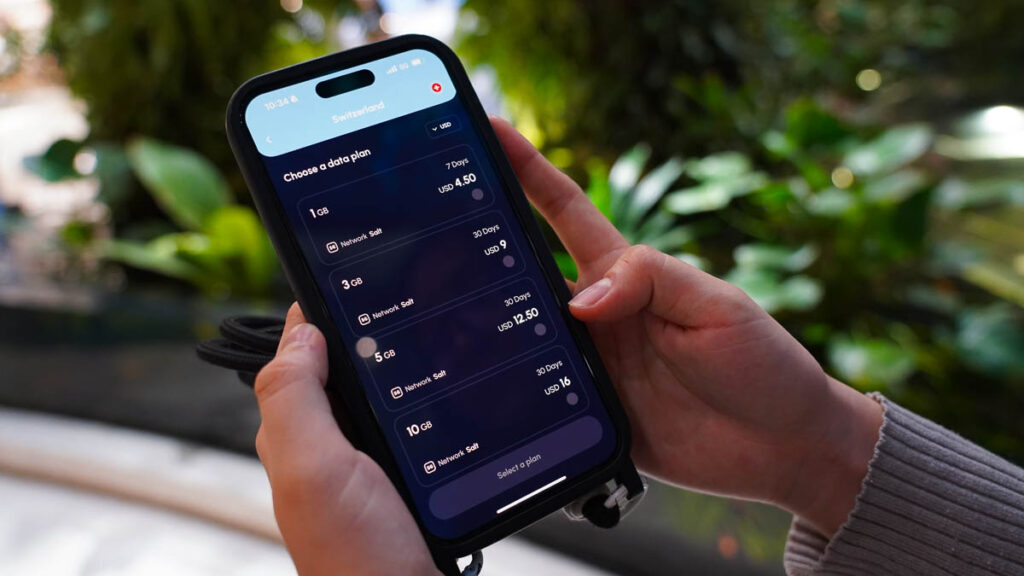
Nomad eSIM offers a variety of data plans, with different coverages, data ranges, and validity periods. This gives you the flexibility to choose a plan that fits both your travel style and data needs.
The plans range from 1GB to 90GB, with validity periods between 7 and 365 days.
Plus, their eSIM covers over 200 destinations worldwide, ensuring seamless connectivity wherever you go. For our 5-day trip to Zurich, we chose the 10GB Single Country Plan for Switzerland. It was great for two people to share, and cost US$16 (~S$20.60) — that’s ~S$10.30/pax!
*Pro-tip: Use the Nomad data calculator to quickly figure out the best plan for your travel needs!
How to Install Your Nomad eSIM (Takes Under 5 Minutes)
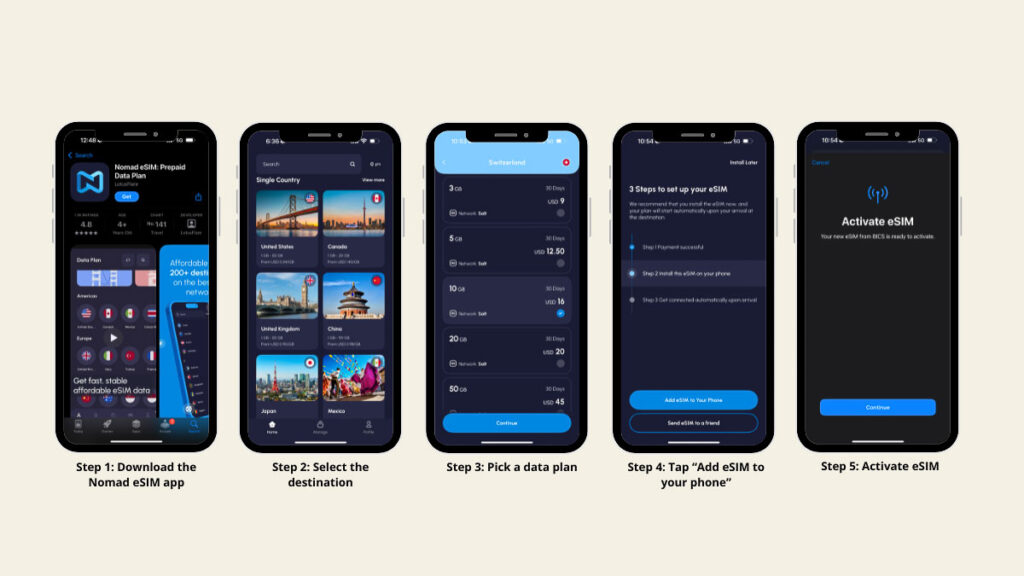
Getting started with Nomad is simple. Just download the app (iOS / Android), choose your destination, and pick a data plan.
Then tap “Add eSIM to your phone”; there’s no need to scan a QR code or remove your physical SIM.
You can activate the plan before your trip, or once you land. And the best part?
Your data only starts counting when you connect to the local network, whereas other eSIMs I’ve used usually start ticking the moment you activate them — even if you’re still at home!
Purchasing a Nomad eSIM for your trip? Use our referral code <NOMADTTI20> to get 20% off all plans, and stay connected in over 200 destinations worldwide. Valid until 31 Aug 2025.
2) Track Your Data in Real-Time
During our trip, the Nomad mobile app was a must-have because it helped us track our data usage in real-time with just a quick glance.
It was clear, fast, and essential for keeping tabs on how much data we had left on our plan.
I found this really helpful, as other eSIMs I’ve used didn’t come with a built-in tracker. I had to rely on the mobile data usage shown in the iPhone settings, which isn’t accurate since it shows the total accumulated data from the entire period the phone has been used.
Android users do have an advantage here, since they can set custom data limits and track usage more precisely.
That said, the Nomad app is still super useful on both iOS and Android — it gives you real-time insights into how much data you’ve used, regardless of your phone’s built-in tools. I still wish Apple would add that data limits feature, though. Maybe one day 😉
3) Turn Off Background App Refresh or Use Low Data Mode

Many apps automatically “refresh” or update themselves — like checking for new content or syncing data, even when you’re not actively using them. This can quietly use up your mobile allowance.
So a simple trick we use while travelling is disabling Background App Refresh for non-essential apps like Calendar, Photos, and anything else we don’t need constantly updating in the background. It’s a small step, but it really helps stretch our data further.
iOS: Settings > General > Background App Refresh > Off
Android: Settings > Network > Data Usage > Restrict Background Data
Using Low Data Mode (on iOS) or Data Saver (on Android) is another quick and effective way to cut down on data usage while travelling. It also loads images in lower quality and pauses automatic app updates, which helps your data last longer without needing to adjust individual settings.
iOS: Settings > Cellular > Cellular Data Options > Low Data Mod
Android: Settings > Network & Internet > Data Saver
4) Download Offline Maps

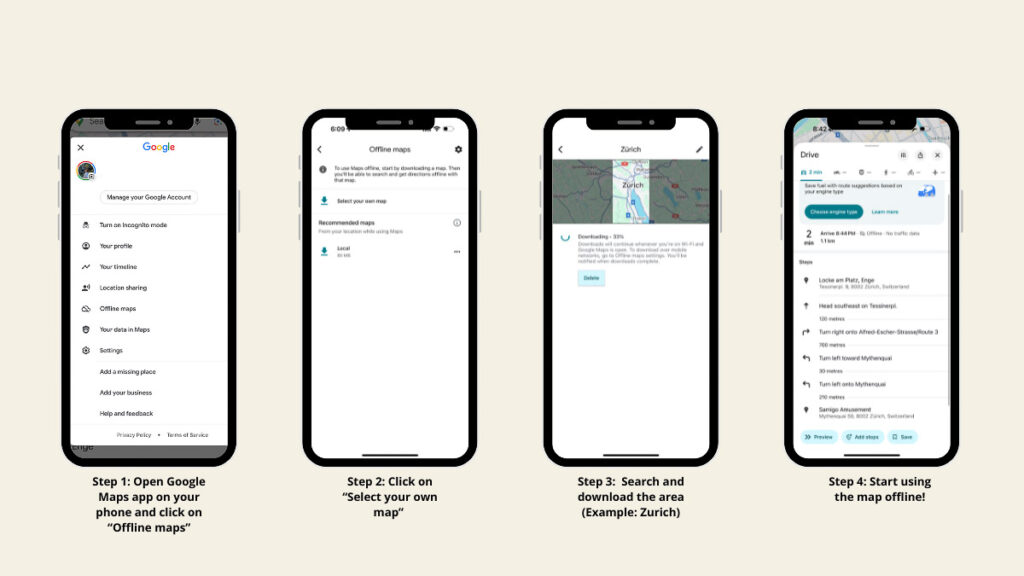
A smart way to save data while travelling is by downloading offline maps in Google Maps before heading out for the day.
While we were in Zurich, we did just that from our hotel WiFi, which made getting around the city simple and stress-free. We always had access to directions without having to use up more of our mobile data.
Here’s a quick tutorial on how to download offline maps using Google Maps 👇
5) Using Public WiFi when Available to Conserve Data

Many places in Zurich offer free WiFi, making it easy to stay connected without using our data. Just remember to use a VPN to protect yourself from possible security risks.
From cafes and restaurants to museums, and even public transport, we often found reliable internet access for free. This included spots like Zurich Main Station and Restaurant Felsenegg.
It’s a convenient way to check maps, message friends, or upload photos while travelling.
*Pro-tip: If you’re travelling in Zurich, use this WiFi map to find free hotspots nearby and stay connected on the go!
Do check that the WiFi is secure before connecting. If the network is unsecure, it is better to tap on your Nomad eSIM for added security.
6) Sharing eSIM Plans

Unlike some eSIMs that don’t allow hotspot-sharing, my friend and I were able to share data across devices with Nomad eSIM.
We got the 10GB plan valid for 30 days to share (US$16, ~S$20.60), which was more than enough to keep us both online for our 5-day trip. At the end, we had only used 6.85GB worth of data (~3.4GB/pax) — girl math approved! 😉
*Pro-tip: For long-term travellers, the Global-EX plan offers worldwide coverage for up to 365 days!
7) Stream Smart

In Switzerland, train rides are a big part of getting around. While they’re scenic and efficient, attractions can be far apart, and WiFi on board isn’t always reliable (or even available). The same goes for flights, where internet access can be limited or costly.
That’s why apps like Netflix, Spotify, and YouTube all let you download content offline, so you can stay entertained without worrying about signal or roaming charges.
Before travelling from Zurich to the Rhine Falls, we downloaded a few shows on Netflix to keep us entertained during the 1-hour train ride.
Try Nomad eSIM

Stable and affordable mobile data is non-negotiable when travelling, especially in Zurich, where every franc counts. With our Nomad eSIM, we avoided the S$50 per day roaming fees, stayed connected everywhere we went, and didn’t compromise on how we used our data.

Personally, I found the Nomad eSIM easy to install and use. And since I activated it before our trip, it automatically kicked in the moment we landed in Zurich. The data was fast and smooth throughout the trip, and being able to track our usage in real time through the app made it easy to stay within our limit, without stress or surprise top-ups.
Purchasing a Nomad eSIM for your trip? Use our referral code <NOMADTTI20> to get 20% off all plans, and stay connected in over 200 destinations worldwide. Valid until 31 Aug 2025.
Want to explore more of Switzerland? Be sure to read these guides and itineraries too:
– 10-Day Switzerland Itinerary — 6 Cities Under S$2.3k with the Swiss Travel Pass
– Switzerland 14 Best Things to Do — From Iconic to New Attractions
– Budget Switzerland Hotels and Hostels — Zurich, Lucerne, Interlaken, Montreux, Zermatt, St Moritz
Any other interesting data-saving hacks we should include in this eSIM guide? Let us know in the comments below.
This post was brought to you by Nomad.


